4.28.2011

[Best Ever!] Mama's Challah Bread


. Okay, I realize Easter has just passed so it would have made sense to post this recipe oh, last week.  But we don't do things in a logical manner around here.  Boo to that.

Challah Bread.  Ever heard of it?  I have to say, the first time I ever came across a recipe for challah bread, I didn't even know how to pronounce it.  And after making the bread (and also falling deeply in love), I would refer to it as 'cha-la' bread and anyone who may have known anything about breads, probably thought I was a complete idiot.  I actually found out how to correctly pronounce this creation while I was watching Throwdown with Bobby Flay on the Food Network one night.  And I was a tad bit off.  It's actually pronounced 'hall-a', kind of like when people say 'holler!' but without the -er.  You get the gist.


Now that we can actually pronounce the name, let's discuss a little about it's history.  I know, I know, history isn't any fun, but you can skip over the next paragraph if you must.

Challah is a central part of Jewish tradition and every Friday night, observant Jews recite three prayers before dinner.  The third blessing is recited over two loaves of covered challah and then pieces of the bread are broken off and given to each person.  This practice represents a continuous connection to the food that grows in the Earth and to God.  Furthermore, work is not allowed on the Sabbath and so the breads and baked goods are all prepared ahead of time.


Yes, I Googled that.  So thank you Google ☺  Also, since bread making does take a fair amount of time, I'll let you in on a little secret.  Our local Great Harvest Bread Company sells challah bread every Friday and I've ventured there several times to grab a loaf.  It's absolutely fantastic and will probably be the closest thing you'll find to homemade bread without having to actually make it (and it makes wonderful bread pudding!).

Now that you know all about challah, let me describe to you how it actually tastes, specifically what this recipe tastes like.  Let me see.  Oh yeah, it's PERFECT!  Seriously, the BEST bread I have ever made.  Bar none.  And my boyfriend is not a bread lover like I am, and he ate almost half of a loaf after he came home from work the day I made this.  It's perfectly soft, perfectly chewy, and has a perfectly slight hint of a buttery taste (even though I still don't know how that works since there is no actual butter in this bread).  And I would like to use 'perfect' a few more times, but I've run out of ideas.  It's beyond fantabulous (see, I had to put words together to let you know how scrumptious this bread is) and doesn't need a thing to accompany it, it is so extremely yummy just on it's own.  We literally sat in the kitchen ripping pieces of bread off and happily munching until we decided we had probably eaten just a little too much.


I do have to warn you that this bread does take a little tender love and care.  But don't be worried, a lot of the time the dough is just resting and you'll be free to do whatever you like.  I spent the day cleaning the house and taking breaks here or there to tend to my baby the dough.  It is SO very worth the time though, trust me on this one.  And this recipe makes two loaves so you'll have plenty for your efforts.  Happy bread making! .

[Best Ever!] Mama's Challah Bread


Ingredients:
2 packages quick-rising yeast
1/2 c. water, warmed to 110°F
3 tbsp. sugar
2 eggs
1/4 c. vegetable oil
8 c. all purpose flour
1 tbsp. salt
2-1/2 c. water
1 egg, beaten

Directions:

1.  Cut a liner from parchment paper to fit the bottom of a 9-inch round cake pan.  Insert the liner and coat with vegetable spray.


2.  Dissolve yeast in warm water.  Add 1 tablespoon sugar.  Set in warm place to proof for about 10 minutes (mixture will bubble when yeast is proofed).


3.  Place eggs and oil in small bowl and beat until combined.

4.  Sift together flour, remaining 2 tablespoons sugar and salt into bowl of standing mixer fitted with a paddle attachment.  Make well in center of dry ingredients, add proofed yeast and mix about 10 seconds.  Add egg mixture and beat to combine.  Slowly add 2 cups of the water.  Remove paddle attachment and replace with dough hook and knead for about 6 minutes at medium speed (if dough is too dry, add remaining 1/2 cup of water).


5.  Oil large bowl.  Place dough in bowl and turn dough so that all surfaces are covered with oil.  Cover with towel.  Put in warm place and allow to rise until double in size (about 1 hour).  Punch down dough and divide in half.


6.  Divide one half of the dough further into thirds.  On lightly floured surface, roll the three dough pieces into ropes about 18 inches in length.


7.  Pinch the three ends of the ropes together.


8.  Braid the dough ropes and pinch together the remaining ends. 


9.  Hold one end of the braided loaf and gently wrap around, creating a circular bread shape.  Pinch the end of the bread to loaf so it stays together.  


10.  Place loaf into pie pan and let rest until double in size (about 30 minutes).  Repeat with remaining half of dough.


11.  Heat oven to 375°F.  Brush tops of challah loaves with beaten egg.  Bake 25 minutes or until golden in color.  Remove from pan and cool on rack to room temperature.


Yield: 2 loaves

*My Notes:
  • The original recipe also suggested adding 1 cup of raisins or dried cherries, which are kneaded into the dough after it is divided in half.  Obviously this would be so great but I do recommend making regular ol' challah bread first.  It will NOT disappoint!

4.26.2011

Tried & True Tuesday: Strawberry Shortcake Cookies

. How was everyone's Easter weekend?!  Hopefully relaxing and filled with family and friends!  Even though I would argue that relaxing, holidays and family don't really go together.  But maybe that's just my family...?  Joking, Dad ☺

My boyfriend and I actually had a very laid back weekend, spent studying for the CPA (boo), cleaning, running around after Leo, and partaking in my most recent home project: painting the kitchen bathroom.  Whew, that's been a project on the back burner.  I decided I had dragged my feet long enough though, so I finally grabbed some paint from Home Depot and got to work.  I've been dead set on painting the bathroom a darker shade of yellow, to go with the antique-y feeling I'm going for throughout our house.  Well...it didn't really turn out like I had hoped.  I'm trying to let it grow on me though.  My assumption is that the change from the original dark red color to yellow was so dramatic (and I felt like I was in McDonald's PlayHouse the entire time), that it's taking me a bit to adjust.  Fortunately the color darkened a little after drying, so I think I'm right on track.


Thoughts?  Opinions?  Good or bad, I'd love to hear it.  I need to get some decorating advice...

Go Packers?

See my dilemma?  Help me out here!

But while you're thinking about the decorating advice you'd like to give, let's get to this recipe.  So we all know it's strawberry season and maybe it's just me, but it appears that the strawberries have been taking steroids.  I made a strawberry dessert this last weekend (not the one I'm posting, but it will definitely be up soon!) and I couldn't believe how HUGE the strawberries are!  You buy a carton and you only get 8 to 10 pieces...rip off?  Well, that could go either way and I can't really complain about monstrous strawberries.  But I will say I enjoy seeing some fresh, ripe produce around here.  It's been way too long.

So for today, I'm posting a recipe that utilizes this seasonal fruit, with simple ingredients that hand over the spotlight to the strawberries.  The Strawberry Shortcake Cookies come, again, from Ms. Martha Stewart.  I wouldn't exactly call these 'cookies', but actually more emphasis on the 'shortcake.'  I would say they're more of the consistency of a soft scone, studded with fresh bits of strawberries and sprinkled with a bit of sugar to lend a slight sweetness [and make them look extra pretty].  The cake [cookie/scone, whatever you want to call it] is very light in flavor so these are, of course, perfect for a mid-morning snack or a spring time dessert.

And don't forget that decorating advice I asked for, I really could use some ☺ .

Strawberry Shortcake Cookies
from Martha Stewart

Such a terrible picture, sorry.  This was taken long before I ever had a blog!

Ingredients:
12 oz. strawberries, hulled and cut into 1/4-inch slices
1 tsp. fresh lemon juice
1/2 c. plus 2 tbsp. sugar
2 c. all purpose flour
2 tsp. baking powder
1/2 tsp. salt
6 tbsp. cold unsalted butter, cut into small pieces
2/3 c. heavy cream
Sanding sugar (for sprinkling)

Directions:
  1. Heat oven to 375°F.  Line two baking sheets with parchment paper.  Combine strawberries, lemon juice and 2 tablespoons sugar in small bowl.  
  2. Whisk together flour, baking powder, salt, and remaining sugar in large bowl.  Cut in butter with pastry blender or rub with fingers until mixture resembles coarse crumbs.  
  3. Stir in heavy cream until dough starts to come together, then stir in strawberry mixture.
  4. Using 1-1/2-inch ice cream scoop or tablespoon, drop dough onto baking sheets, spacing evenly apart.  Sprinkle with sanding sugar.  Bake 24 to 25 minutes or until golden brown.  Transfer to wire rack to let cool.
Yield: 3 dozen cookies

*My Notes:
  • These cookies are best served the day they are made.  And unfortunately, they only keep for about a day.  A little give and take when you're baking with fruits...
  • If you can, try to avoid having the strawberries at the bottom of the dough ball.  When I made these, the strawberries on the bottom charred a bit and that just isn't very appealing.

4.21.2011

Easter Carrot Cupcakes


. Whew, what a crazy last 24 hours!  It's been filled with batches of [botched] cupcakes, a little sleep, full day of work, my mom and brother coming to Omaha for all of 2 hours, and a new little addition to the household for the coming month.

And who is this new member of the family, you ask?!  Well it's that little [big] guy below, my brother's beagle, Leo!


Whether we're prepared for a four dog adventure or not, we got it!  My brother has finals during the first week of May and along with that, working, and productive extracurriculars, his time at home is going to be severely limited.  So, as a good sister would (wink, wink), I offered up my services to watch Leo for the month of May.  My boyfriend and I are both very excited to have this little guy around but...you may want to check back in with us half way during May.  Could be a different story?  Joking!  We'll have our hands full for sure but Leo is such a cute boy, I know he'll fit riiight in with us.

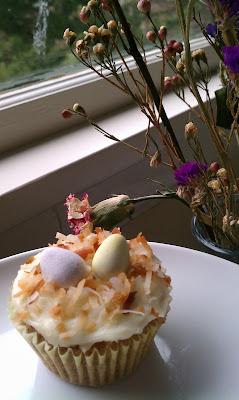
But let's get to these Carrot Cupcakes that I promised you on Tuesday!  Okay, so the overall cupcake turned out great: moist, flavorful, and I must say, so incredibly cute!  And aside from the frosting, this is a one-bowl cupcake recipe!  Can't get much easier than that ☺ But not going to lie, there was a teeny road bump along the way.  I wanted to double the batch since the original recipe only makes a dozen cupcakes (these were for Treat Day at the office and there's definitely more than 12 people in my department!).  However, somewhere along the way something went wrong and I ended up with cupcakes caving into themselves.  In a panic, I started a second batch [without doubling the recipe] and the cupcakes turned out fairly well.  They still didn't look like I remembered but the flavor was there so that's all that matters.  The rest of the way was smooth sailing: a sweet cream cheese frosting, toasted coconut, and a few Cadbury Chocolate Eggs to top off this Easter goodie.  My goal was to end up with a 'birds nest' on top of the cupcake (in the spirit of Easter) and I think I ended up with a pretty good representation.  You can be the judge though.

I truly wish everyone a very Happy Easter and hope that these Carrot Cupcakes make their way onto your dessert table! .

Carrot Cupcakes
Adapted from Martha Stewart


Ingredients:
Cupcakes:
1 c. sugar
1/3 c. vegetable oil
2 tbsp. orange juice
1 tsp. vanilla extract
2 large eggs
1 tsp. baking powder
1/2 tsp. baking soda
1/2 tsp. ground allspice
1/2 tsp. salt
3/4 c. plus 2 tbsp. all purpose flour
1-1/2 c. finely shredded carrots
1/2 c. chopped walnuts
1/4 c. shredded coconut

Frosting:
8 oz. cream cheese, room temperature
3/4 c. powdered sugar

Garnish:
1 c. shredded coconut
1 (10 oz.) package mini chocolate eggs

Directions:

1.  Heat oven to 350°F.  Oil or line with muffin cups a standard muffin tin.  In bowl, combine sugar, vegetable oil, orange juice, 1/2 teaspoon vanilla extract, and eggs.


2.  Stir in baking powder, baking soda, allspice, and salt.  Add flour; mix.  Stir in carrots, walnuts and coconut.


3.  Divide batter evenly among muffin cups.  Bake 25 minutes or until toothpick inserted in center of cupcake comes out clean.  Let cool completely.


4.  Spread coconut for garnish evenly on baking sheet.  Bake 3 minutes and then toss coconut to mix.  Bake additional 3 to 5 minute or until toasted and golden.  Set aside.


5.  For frosting, in medium-sized bowl, combine cream cheese, powdered sugar and remaining 1/2 teaspoon vanilla extract.  Whisk until smooth.


6.  Frost cupcakes.  Garnish with toasted coconut and place two to three chocolate eggs on top.  


Yield: 1 dozen cupcakes


*My Notes:
  • To make the cupcake batter, I only had to use one bowl and mixed everything with a spatula.  So very easy and less clean up!
  • I usually shred my own carrots, but for some reason this time around I bought already shredded carrots.  The pieces were a tad bit large, still good, but I would recommend buying finely shredded carrots or just doing it yourself.
  • When filling the cupcake liners, I only filled them about 1/2 full.  I personally like the look much better and having a more flat top for the garnishes worked out very well. 

4.19.2011

Tried & True Tuesday: Coming Thursday!

.  It's late.  I'm tired.  But the Tried & Tuesday post is quietly calling my name, so I'm going to make this quick!

But in actuality, a short [but sweet] and recipe free post is perfect for tonight for several reasons.  I'm not getting to this post until late (yes, I realize it's only 9:39 P.M. but I need my sleep ☺) because my boyfriend and I had the chance to attend the Creighton vs. Nebraska baseball game.  And no, it wasn't just ANY baseball game, because if it was, I definitely wouldn't have gone tonight seeing as it was only around 35°F out.  But tonight's game had a special significance...it was the first baseball game in the brand new TD Ameritrade College World Series (CWS) stadium!  The field is gorgeous, has perfectly cut green grass, a beautiful concourse, and fabulous amenities.  It's by far [stated by my boyfriend] the nicest college stadium in the nation.  And I quote "I can't even think of another stadium that even comes close."  So that gives you an inkling about what we were privileged to experience.

Probably doesn't do the stadium justice, but you get the idea!

This quick post [that is turning into a normal post] will also be recipe free because I'll be making the recipe I wanted to post tomorrow night!  A few co-workers of mine have recently accepted new positions, so as tradition calls, we are having a Treat Day on Thursday to say good luck and farewell.  As such, I'll be bringing in Carrot Cupcakes to celebrate.  I also chose these for my last Easter-themed post, since Easter is [oh my I can't believe it already!] this weekend!  So, in order to bring my lovely readers back (if I have any...), I'll be putting up the Carrot Cupcake recipe on Thursday after I'm able to relive this treat and also add some fun Easter touches.  Until Thursday! .

4.17.2011

Sunday Special: Thick & Fluffy Pizza Crust

. Okay, so remember last weekend and the Margherita Pizza recipe?  Well if you don't recall, my boyfriend and I have decided to try our hand at pizza making from time to time, attempting to find that perfect crust recipe and testing out the perfect combinations of toppings.  For our first shot, I was very happy with the Margherita Pizza.  Yes, there were a few things here and there that we would change next time around but overall, it was very good!

So you would think that our second attempt would be a little better, right?  Oh, wrong!  It actually makes me laugh when I think about how so not good this last pizza was.  SO not good, that I'm only going to be giving you the crust recipe because THAT was fantastic!  But we'll get to that in a second.

As we all know, there are zero cooking skills that reside in our house.  None.  At.  All.  So I can't really blame anyone on our lack of know-how when it comes to certain things.  But for some reason, it never crossed EITHER of our minds that some toppings might need to be prepped and cooked before making their way on the pizza and into the oven.  So when we decided to make a garbage pizza, filled with ground turkey, green bell peppers, onions, and mushrooms, let's just say that our pizza turned out quite...natural tasting.  Don't fret, we definitely cooked the turkey!  But when it came to the veggies, they went on the pizza au natural, crunchy and all.  And when they came out of the oven?  They came out well...crunchy.  Let me tell you, there was NO flavor to those suckers whatsoever.  Obviously.  And we also decided to use tomato paste for our sauce, and we both agreed that was a major fail as well.  All in all, it was just plain bad.

However, the crust recipe I used, from A Passion for Baking by Marcy Goldman, was unreal!  It turned out super thick (my favorite!), soft and fluffy.  It was definitely an upgrade from the previous pizza crust we made, especially if you like thick-crust pizza.  I don't know what it is about Marcy, but she's got skills!

So since there really was no 'cooking' that went on last weekend, just some chopping of veggies and throwing them on a crust, I'm just going to give you a deliciously chewy pizza crust.  And I also love this recipe because it's one of those great base recipes I'm always looking for.  You can make this bread into anything you'd like, top it with some butter and cinnamon-sugar for a sweet treat or if you're looking for something savory, make it into garlic-parmesan bread sticks!  It's really very versatile and one of the many reasons that I love it.  So use this recipe for a fun, savory Sunday pizza or a scrumptious dessert pizza, either way you'll have a winner.  Just don't follow my lead when it comes to the Garbage Pizza failure, I know you're smarter than that ☺ .

Thick & Fluffy Pizza Crust
from A Passion for Baking

I'll admit, this looks good...but it was nothing but bland.  The crust was by far the star!

Ingredients:

1-1/2 c. warm water
5 tsp. rapid rise yeast
1/4 c. olive oil
4 tsp. honey
1 large egg
2-1/2 tsp. salt
4 to 6 c. bread flour

Directions:
  1. In mixer bowl, hand whisk water and yeast together and let stand 2 to 3 minutes to dissolve yeast.  Briskly whisk in oil, honey, egg, salt, and most of bread flour.  Mix ingredients; attach dough hook and knead on lowest speed 8 to 10 minutes, dusting in more flour as necessary to form soft dough.
  2. Remove dough hook and spray dough with nonstick cooking spray.  Cover bowl and let dough rise 30 to 45 minutes or until almost doubled.
  3. Heat oven to 500°F.  Pat out dough to fit pizza pan.  If making pizza, spread tomato sauce evenly on dough and bake 15 minutes.
  4. Remove from oven and spread desired toppings over crust.  Bake additional 10 minutes or until cheese is melted and crust is golden brown.
Yield: 1 pizza

4.14.2011

Chocolate Chip Cookie Pie


. Chocolate Chip Cookie Dough.  Pie Crust.  Pie Crust.  Chocolate Chip Cookie Dough.

Just the mention of those words makes my mouth water.  I mean really, who doesn't love chocolate chip cookie dough right out of the bowl?  Don't be ashamed, we all do (even if we try to keep it a secret).  And who can resist a perfectly flakey, buttery pie crust?  I sure can't!  So it seemed like the heavens had collided and the planets had aligned when I first came across this recipe on Love From the Oven.  I have to admit though, my Bacon-loving Friend gave me the push to get this goodie at the top of my to-make list, so I can't take ALL of the credit ☺

Actually, I would like to take a moment to congratulate my Bacon-loving Friend on her most recent accomplishment.  A couple of weeks ago, Bacon-loving Friend got her 'score' for her FINAL section of the certified public accountant (CPA) exam.  And....dum ,dum, da dum!  She passed with FLYING colors!  For the accountants of the world (even though I'm not one but since I'm surrounded by them on a daily basis and oh yeah, my boyfriend is one, I know this), you know the hard work, long hours of studying, and endless number of social events given up, to study for this thing.  It basically consumes their life.  Completely not any fun for anyone and everyone around them, but it's just something those accountants have to do.  It comes with the profession.  Anyway, Bacon-loving Friend has passed her exam and rightfully claimed her life back (wink, wink)!  So...

ConGratulAtiOns!!

Which brings me to the reason the Chocolate Chip Cookie Pie became numero uno on my list.  A demanding polite request was submitted by Bacon-loving Friend to bring in this wondrous creation to the office in celebration of her hard-earned certification.  And I obviously can't pass up any excuse to bake (even though this was a legit reason), so I promptly organized the things I needed and got to it.


Oh. My. Word.

First off, this pie was devoured before lunch time.  But who can blame my co-workers?  Chocolate Chip Cookie Dough.  Pie Crust.  Pie Crust.  Chocolate Chip Cookie Dough.  Remember?  This pie, any way you slice it, is truly a little piece of heaven.  The crust is well, perfect.  Not to toot my own horn or anything because it's definitely not recipe created by me, but it is SO good!  I made the pie crust using a recipe from my Heirloom Baking book.  I've actually used it for several other pies but this time around, it turned out just right.  I think it had a lot to do with using the food processor, so my [greasy] hands weren't all over the dough.

And what can I say about this filling to really give you the full effect?  Let's see...it's gooey.  It's buttery.  It's chocolatey.  It's DELISH!  That's all folks.

Joking, but the chocolate chip cookie dough filling is indescribable.  The only reference I can use is that it highly resembles the consistency of pecan pie filling (Note:  I've never had pecan pie but I've seen it and Bacon-loving Friend thought so, too).  But regardless, it's unreal!

So what am I going to leave you with?  A COMMAND to make this pie for your guests [and yourself] this weekend.  Do everyone a favor, please .

Chocolate Chip Cookie Pie
Adapted from Love From the Oven


Ingredients:
Crust:
2-1/2 c. all purpose flour
1/3 c. sugar
1/4 tsp. salt
1 c. cold butter, cut into 1/2-inch slices
1/4 c. ice water

Cookie Dough Filling:
2 large eggs
1/2 c. all purpose flour
1/2 c. sugar
1/2 c. light brown sugar, packed
3/4 c. butter, softened
1 c. semisweet chocolate chips
1 c. pecans or walnuts (optional)

Directions:

1.  For crust, place flour, sugar and salt in bowl of food processor fitted with metal blade.  Pulse three times to mix.  Add butter and pulse until crumbly.  Add water.  Pulse until mixture comes together.


2.  Remove dough from bowl of food processor, divide in half and shape each half into a disk.


3.  Roll out one disk of dough between 2 sheets of floured wax paper or parchment paper until 2 inches wider than the pie plate.

4.  Fold rolled disk in half and then in quarters.  Place folded dough into bottom quarter of pie plate.  Carefully unfold dough and let it relax into plate.  Trim excess dough around rim, and form decorative edge as desired.  Chill dough while preparing filling.


5.  Heat oven to 325°F.  For filling, beat eggs in mixer until foamy.  Add flour and both sugars; beat until well blended.  Beat in butter.  Stir in chocolate chips and nuts.  Pour batter into prepared crust and spread out evenly.  


6.  Bake 50 to 55 minutes.  Let cool before serving.


Yield: 12 servings


*My Notes:
  • The crust recipe actually makes enough dough for two crusts.  Knowing this, I decided to double the filling and make two pies (I know, dangerous because I knew I'd chow on this!) and both turned out great!  So give one to your friends and keep the other one allllll for yourself, that's what we did ☺
  • The original recipe on Love From the Oven makes this pie with a store-bought crust, which is obviously just fine!  It's definitely a time saver, so if you need something quick, there's your answer (but I must say, my pie crust is super easy and fast as well...no pressure).
Related Posts Plugin for WordPress, Blogger...

Blog Design By: